Some of our favorite ways to use the fresh, seasonal produce we grow at Green Heart Garden, as well as recipes contributed from our members.

Who doesn’t love a good chicken dish? Chicken is versatile, affordable, and easy to cook. But sometimes, it can get boring and bland. That’s why I love this blackened chicken with brown butter green beans recipe. It’s a game-changer for your chicken routine.
You can used a pre-made blackening seasoning, which you can find it in most grocery stores, or you can make your own using this recipe. The chicken is seared in a cast-iron skillet and then baked in the oven until juicy and tender.
The green beans are cooked until crisp-tender and then tossed with a brown butter sauce that is out of this world. The sauce also has garlic, lemon juice, and parsley, which brighten up the dish and complement the chicken.
This dish is so easy to make, and it only requires a few ingredients and equipment. It’s a great meal for any day of the week, whether you want to impress your family, friends, or date, or just treat yourself to something tasty.
If you don’t like or have green beans, you can use any other green vegetable, such as broccoli or asparagus. Just make sure to adjust the cooking time accordingly.
If you want to make this dish more or less spicy, you can adjust the amount of blackening seasoning or cayenne pepper to your liking. You can also add some hot sauce or red pepper flakes to the sauce for some extra kick.
You can store the leftovers of this dish in an airtight container in the refrigerator for up to 3 days. To reheat, you can microwave them for a few minutes, or heat them in a skillet over medium-low heat, stirring occasionally, until warmed through.
You can also freeze the leftovers of this dish in a freezer-safe container or ziplock bag for up to 3 months. To reheat, you can thaw them in the refrigerator overnight, or microwave them for a few minutes, or heat them in a skillet over medium-low heat, stirring occasionally, until warmed through. You may need to add some water or broth to the sauce if it’s too thick.

Today I’m going to share with you one of my go-to recipes for a satisfying and healthy lunch or dinner: BLTA salad wraps. If you love BLT sandwiches, you’ll love these wraps too. They have all the flavors and textures of a BLT, but with the addition of creamy avocado dressing. They’re also super easy to make, with only 10 minutes of prep time and one pan. You can bake the bacon in the oven while you chop the veggies and make the dressing. Then, you just assemble the wraps and enjoy. They make a great lunch to take to work or school, or a quick light dinner for busy nights.
This recipe is very versatile and you can customize it to your liking. Here are some ideas:
If you have any leftover, wrap each one tightly in some foil or plastic wrap. Enjoy them cold or room temperature, no need to reheat, which makes them a perfect meal prep lunch.
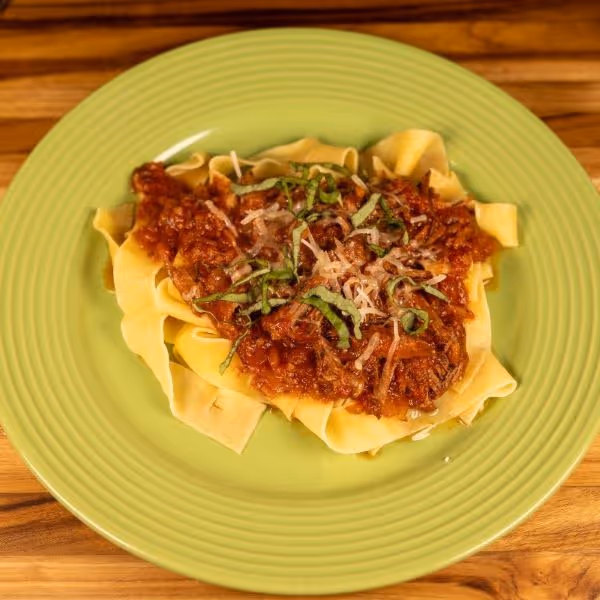
Imagine the rolling hills of the Italian countryside, the scent of fresh tomatoes and herbs wafting through the air, and a table set for a feast that brings warmth to the heart. That’s the essence of Sugo alla Contadina, a traditional farmer’s sauce that embodies the simplicity and richness of Italian cooking. This sauce, with its tender beef and robust flavors, is a tribute to the generations of farmers who have cultivated the land and brought such incredible flavors to our tables. It’s not just a recipe; it’s a culinary journey that invites you to savor every bite and create memories around the dinner table.
Store any leftover sauce in an airtight container in the refrigerator for up to 3 days. To reheat, simply warm the sauce over medium heat on the stove, stirring occasionally until heated through. If the sauce has thickened too much, you can thin it with a little water or broth to reach the desired consistency.
Sugo alla Contadina freezes beautifully. Cool the sauce completely, then transfer it to freezer-safe containers or bags, leaving some space for expansion. Freeze for up to 3 months. To reheat, thaw the sauce in the refrigerator overnight, then warm it on the stove over medium heat, stirring occasionally. If necessary, add a splash of water or broth to adjust the consistency.

Are you looking for a way to spice up your falafel game? Then you will love this zucchini falafel recipe. It’s a twist on the classic falafel dish that adds zucchini to the chickpea mixture, making it more moist, nutritious, and flavorful. Plus, it’s vegan, easy to make, and can be baked for a healthier version. Whether you serve it with pita bread, salad, or dips, this zucchini falafel will satisfy your taste buds and your hunger.
This recipe provides instructions for both baking and frying the falafel. Frying them will result in a crispier falafel, but baking them significantly reduces the amount of fat. No matter which method you choose, it’ll result in a delicious falafel.
This recipe can easily be adjusted according to your taste and dietary needs. Here are some suggestions for substitutions and variations:
You can serve these zucchini falafel in many different ways, depending on your mood and occasion. Here are some ideas for serving suggestions:
You can make these zucchini falafel ahead of time and store them in the fridge or freezer for later use. Here are some tips for making, storing, and reheating them:
To store the leftovers, you can let them cool completely and store them in an airtight container in the fridge for up to 4 days.
To reheat the leftovers, you can microwave them for a few seconds until warm, or heat them in a skillet over medium heat, turning occasionally, until crisp and hot. You can also reheat them in the oven at 375°F for 10 minutes, flipping halfway, until heated through and crisp. You can also reheat them in an air fryer at 375°F for 5 minutes, shaking the basket halfway, until crisp and hot.
You can also make the falafel ahead of time before cooking them for a quick & easy weeknight meal. Just store the uncooked falafel balls in an airtight container for up to 2 days before cooking them.
These falafel are definitely better if you freeze them after they’re cooked. If you freeze them raw, they tend to get mushy and difficult to handle after you defrost them.
To freeze them after cooking, let them cool to room temperature. Then place them on a parchment lined baking sheet and place in the freezer until frozen solid. Transfer them to an air-tight freezer container and freeze for up to 3 month.
To reheat, simply defrost the falafel in the fridge, then follow the reheating instructions listed above.
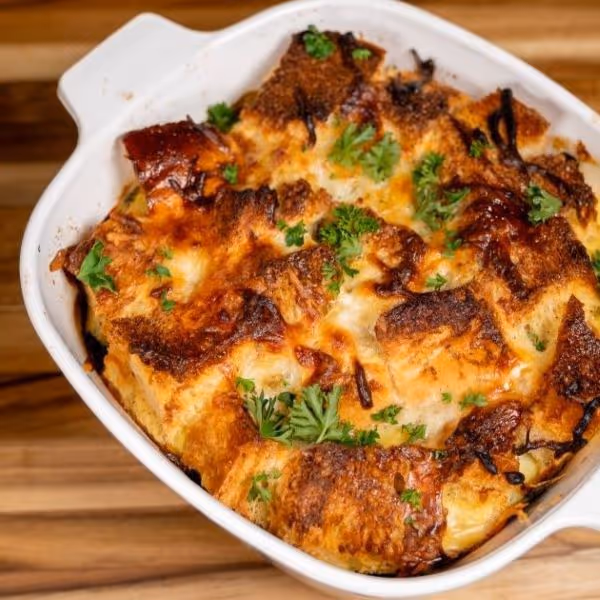
Every culture has its own “clear out the fridge” dish designed to use up leftover ingredients so they don’t go to waste. My all-time favorite of these is the Italian strata. It's a simple and satisfying meal that can be customized to your taste and preferences. All you need is some bread, eggs, milk, cheese, and veggies. You can also add some meat if you like, such as sausage or bacon. The best part is that you can make it ahead of time and bake it when you're ready to eat.
Italian Strata is basically a layered casserole of bread cubes soaked in an egg and milk mixture, topped with cheese and veggies. It's similar to a frittata or a quiche, but with more texture and flavor. It's also a great way to use up stale bread, as the egg mixture softens and moistens it. You can use any kind of bread you like, but I recommend using a crusty bread, such as sourdough, French, or Italian. It will hold its shape better and add more crunch to the dish.
Since this is a dish to help you use up leftovers, it is incredibly adaptable. You can use whatever veggies, cheese, bread, or meat you have on hand. Here are some suggestions for substitutions and customizations:
You can store the leftover strata in an airtight container in the refrigerator for up to 3 days. To reheat it, you can either microwave it for a few minutes, or bake it in a 350°F oven for 10 to 15 minutes, until warmed through and bubbly.
You can also freeze the strata for up to 3 months. To do so, you can either freeze the unbaked strata, or the baked strata. Here are the steps for each method:
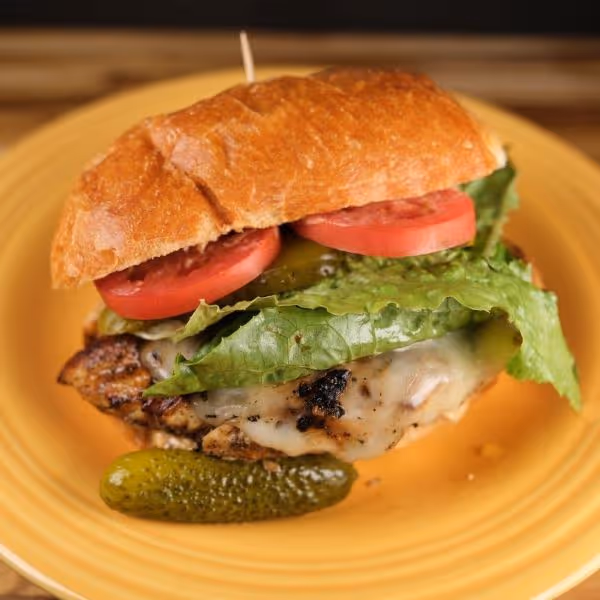
There's something about a good sandwich that just hits the spot. And this blackened chicken sandwich is no exception. It's packed with layers of deliciousness, from the tender and spicy chicken, to the smoky and melty cheese, to the crisp and fresh lettuce, tomato, and pickle. And don't forget the toasted brioche bun, which adds a touch of sweetness and richness to the whole thing.
This sandwich is not only tasty, but also easy to make. You don't need any fancy ingredients or equipment, just some basic pantry staples and a skillet. You can whip up this sandwich in less than 30 minutes, making it perfect for a quick lunch or dinner. Plus, you can customize it to your liking, with some simple substitutions and variations.
If you don't have brioche buns, you can use any other kind of bread you prefer, such as ciabatta, sourdough, or whole wheat. Just make sure to toast it lightly for some extra crunch and flavor.
If you have any leftover chicken, you can store it in an airtight container in the refrigerator for up to 3 days, or in the freezer for up to 3 months.
To reheat the chicken, you can microwave it for a few seconds, or heat it in a skillet over medium-low heat, until warmed through. You can also slice it and add it to a salad, wrap, or pasta dish.
If you have any leftover mayonnaise, you can store it in an airtight container in the refrigerator for up to a week. You can use it as a dip, dressing, or spread for other sandwiches, burgers, or fries.
If you want to freeze the chicken, first let it cool completely, then store it in an airtight container or freezer bags.
To reheat the frozen chicken, you can thaw it in the refrigerator overnight, or in the microwave for a few minutes. Then, you can follow the same steps as above to reheat it in the microwave or in the skillet.
Homemade Blackening Seasoning
Cajun Mayo

Have you ever made risotto and ended up with more than you could eat? Don’t let that creamy rice go to waste. Turn it into Arancini, the ultimate comfort food from Sicily.
Arancini are basically rice balls filled with cheese, coated with bread crumbs and fried until golden and crisp. They are crunchy on the outside, gooey on the inside, and bursting with flavor. You can eat them plain or dip them in marinara sauce for extra yumminess.
The best part about Arancini is that you can make them ahead and freeze them for later. They are perfect for parties, picnics, or whenever you need a quick and tasty bite. Trust me, once you try them, you’ll be hooked.
Arancini are very versatile and you can customize them to your liking. Here are some ideas for substitutions and variations:
Arancini are best served right away, but they can be stored in the refrigerator for up to 3 days. To reheat them, you can either bake them in the oven at 375°F for 15 minutes, or pop them back into some hot oil to fry to ensure they stay nice and crispy.
You can freeze the arancini after you fry them, but I find freezing them before they’re fried results in a crispier ball.
To freeze them before frying, instead of placing the balls in the fridge for an hour to firm up, place them in the freezer for an hour. Then, transfer them to a freezer bag or other air-tight container.
When you want to eat them, remove from the freezer and let them sit on the counter for 15 minutes. Then, follow the frying instructions in the recipe. Since they’re colder than they would be if frying them unfrozen, it may take a few minutes longer for them to turn golden brown.

Avocado toast has become a go-to quick and easy breakfast for many, but sometimes you might want to switch things up and try something new. That’s why I created this romesco and manchego toast with fried egg, a mouthwatering dish that will satisfy your taste buds and your hunger. Romesco sauce is a traditional Catalan condiment that has a rich and complex flavor that goes well with almost anything. This sauce is vegan, gluten-free, and healthy, and you can make it in advance and store it in the fridge or freezer for later use.
To make the toast, I use como bread, a rustic Italian bread that has a soft crumb and a crunchy crust. I toast it until golden and crisp, and then I spread the romesco sauce over it. I top it with some arugula and sliced manchego cheese, a Spanish cheese that is made from sheep’s milk and has a nutty and tangy taste. Then, I add a fried egg on top. I like my egg with a runny yolk, but you can cook it to your preference.
This simple recipe is a filling and delicious breakfast that you can make in no time. It’s a breakfast with a Spanish twist that will make you feel like you are on a vacation. You can enjoy it with a cup of coffee, tea, or juice, and start your day with a smile!

Have you ever tried romesco sauce? It is one of my favorite sauces ever, and I’m sure you’ll love it too. It has a rich and complex flavor that comes from the combination of roasted peppers, almonds, garlic, and vinegar. It is a staple in Catalan cuisine and is often served with grilled vegetables, fish, or meat. But you can also enjoy it with bread, crackers, or fresh veggies as a snack or appetizer. It is also great for adding some color and texture to your salads, sandwiches, wraps, or bowls.
This recipe is a twist on the classic romesco sauce, using fresh bell peppers and roma tomatoes instead of jarred ones. I love roasting them in the oven until they are soft and charred, which enhances their sweetness and flavor. I also use sherry vinegar instead of red wine vinegar, which adds a more complex and nutty taste to the sauce. And of course, I don’t forget the smoked paprika, which gives the sauce a nice smoky aroma and a beautiful red color.
This sauce is so easy to make, you just need a blender or a food processor and a few ingredients. It is also vegan and gluten-free. It is a perfect sauce for any occasion, whether you want to impress your guests, treat yourself, or use up some leftover peppers and tomatoes.
This sauce is very versatile and you can use it for many different dishes. Here are some ideas for how to use it:
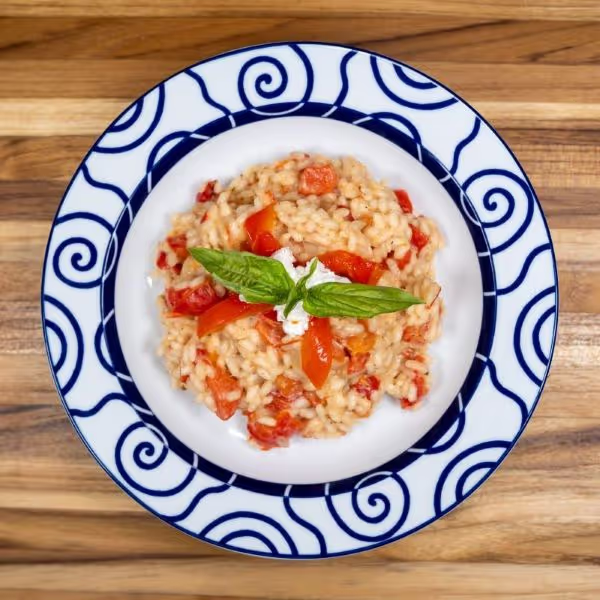
Welcome to a world where comfort food meets gourmet - our Roasted Red Pepper and Goat Cheese Risotto is a dish that promises to delight your taste buds and impress your dinner guests. With its vibrant colors and layers of flavor, this risotto is not just a meal; it’s a celebration of fine ingredients coming together in perfect harmony. The sweetness of roasted red peppers paired with the creamy tang of goat cheese creates a symphony of flavors that’s hard to resist. Whether you’re looking to spice up a weeknight dinner or searching for the perfect dish to serve at a gathering, this risotto is sure to be a crowd-pleaser.

Huevos rancheros is a staple in many Mexican households, and it's a great way to start your day with a burst of flavor and protein. The best part is that you can make your own ranchero sauce using fresh ingredients, and customize it to your liking. The result is a hearty and satisfying meal that will keep you energized for hours.
If you want to make your morning easier, you can also make the sauce ahead of time and reheat it later, or freeze it for future use. It's a great dish to make for a crowd, or for yourself when you need a quick and easy breakfast. Ready to try it? Let's get started!
The assembled dish is best served fresh, but if you have leftover sauce and beans, you can store those separately in the fridge for up to 4 days, then just fry the tortillas and eggs and assemble them when you’re ready to dig into those leftovers.
You can also freeze the ranchero sauce for up to 3 months. To reheat, simply thaw it in the microwave or on the stovetop, and bring it to a boil.
For the Sauce:
To Assemble:
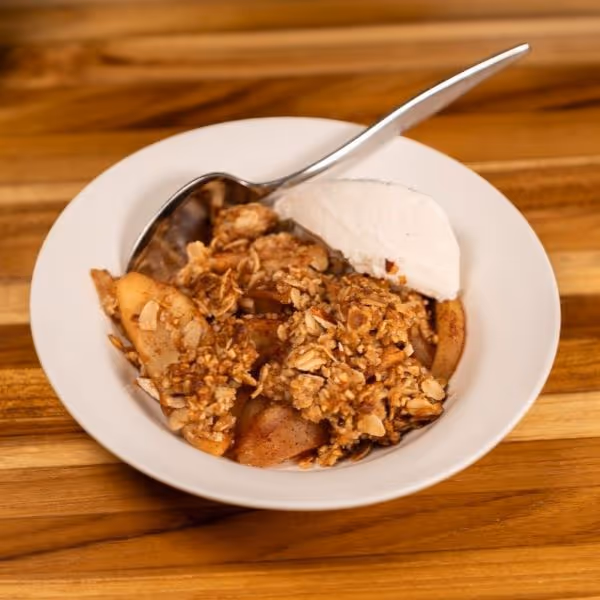
One of my favorite desserts for chilly days is a spice pear crisp that’s warm, comforting, and full of flavor. If you love apple crisp, you’ll love this pear version too. It has a tender and juicy pear filling, spiced with vanilla, cinnamon, cardamom, nutmeg, and ginger and a crunchy oat topping. The best part is, this pear crisp is super easy to make, with only 10 minutes of prep time and one bowl. You can bake it right away or freeze it for later, making it a great way to use up those ripe pears you have in your kitchen.
This recipe is very adaptable and you can make some substitutions to suit your preferences or dietary needs. Here are some options:
When choosing pears for baking, you want to look for firm, slightly underripe pears that will hold their shape and flavor well under heat. Some of the best varieties for baking are Bosc, Anjou, Bartlett, and Concorde. Avoid using overly ripe or soft pears, as they may become mushy and watery when baked. You can also use a mix of different pears for more variety and complexity.
If you have any leftovers of this pear crisp, you can store them in an airtight container in the refrigerator for up to 4 days. To reheat, you can either microwave individual servings for a few seconds, or bake the whole crisp in a 350°F oven for 10 to 15 minutes, until warm and bubbly.
For the filling:
For the topping:
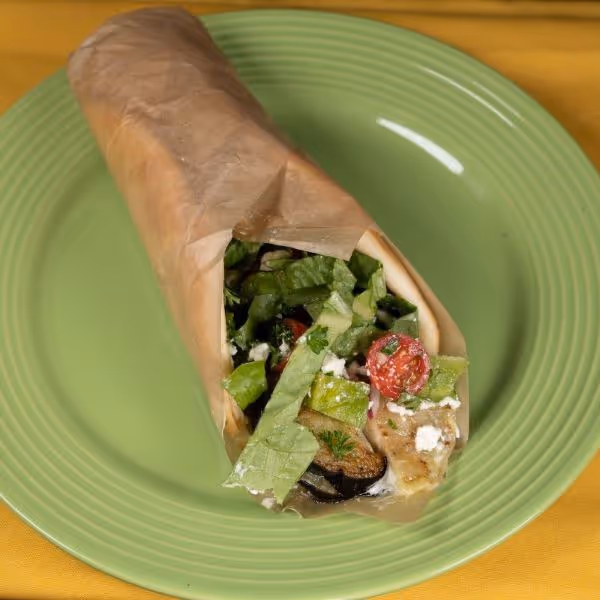
If you love eggplant, you will love this recipe. Eggplant really shines when fried until golden and crisp. These wraps also feature toum, which is a Lebanese garlic sauce that is creamy, potent, and addictive, as well as çoban salatası, which is a Turkish shepherd salad made with tomatoes, cucumbers, green peppers, onion, parsley, olive oil and lemon juice. As you can see, these wraps are just packed with summer veggies!
To make these wraps, you will first need to fry the eggplant slices in some oil until crisp and golden. Then, you will spread some toum over the flatbread of your choice, top with some romaine lettuce and fried eggplant, and spoon some Çoban salatası over the filling. Fold and roll the bread tightly, cut in half, and enjoy!
You can customize these wraps to your liking by using different sauces, salads, or fillings. Here are some suggestions:
These wraps are best served fresh, but you can also store and reheat the leftovers. Here are some tips:
For the fried eggplant:
To Assemble:
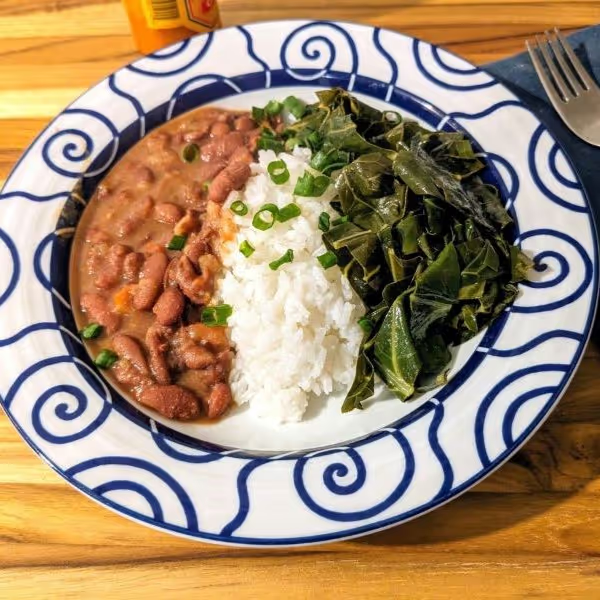
Who says you need meat to make a satisfying and hearty meal? This recipe for Red Beans and Rice with Braised Collard Greens proves that you can enjoy a meatless dish that is full of flavor and protein. It’s a simple and easy recipe that you can make with pantry staples and fresh greens.
The red beans are cooked with onion, bell pepper, celery, garlic, and Cajun seasonings, creating a thick and savory sauce that coats every bite. The rice is the ideal accompaniment to soak up the sauce and add some texture. The collard greens are braised in butter, broth, vinegar, sugar, and hot sauce, adding a touch of sweetness and tanginess to the dish. The result is a balanced and satisfying meal that will fill you up and warm you up.
This dish is also very budget-friendly and versatile. You can make a big batch and store it in the fridge or freezer for later use. You can also customize it to your liking by adding or swapping some ingredients. It’s a dish that you can enjoy any time of the year, whether it’s a chilly winter night or a sunny summer day.
If you want to add some meat to this dish, you can use andouille sausage, smoked ham, bacon, ham hock, or leftover ham from a roast. Just cook the meat with the onion, bell pepper, celery, and garlic, and then add the beans and water.
You can store the leftovers of this dish in an airtight container in the refrigerator for up to 4 days. To reheat, you can microwave it for a few minutes, stirring occasionally, until hot. You can also reheat it on the stovetop over medium-low heat, adding some water if needed to thin the sauce.
You can freeze this dish in a freezer-safe container or a ziplock bag for up to 3 months. To reheat, you can thaw it in the refrigerator overnight, and then follow the same steps as above. You can also reheat it from frozen, but it may take longer and you may need to add more water to prevent burning.
For the Beans:
For the collard greens:
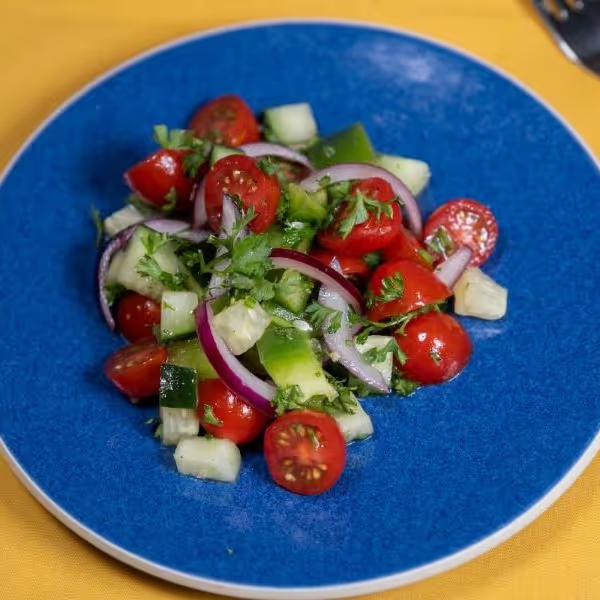
Çoban salatası is a popular side dish in Turkey and other parts of the Middle East and Mediterranean. It’s named after the shepherds who used to make it with fresh vegetables they brought to the fields. It’s a very versatile salad that can be served with almost any meal, or eaten on its own as a light snack.
One of the best ways to enjoy this salad is as part of a mezze platter, which is a selection of small dishes that are shared among friends and family. You can pair it with other Turkish delights such as hummus, baba ganoush, dolma, and pita bread. It also goes well with Turkish dishes such as kebabs, borek, or gozleme.
One of the best things about this salad is that you can easily customize it to suit your taste and dietary needs. Here are some ideas for how to make this salad your own:
This salad is best eaten fresh, as the vegetables tend to lose their crunch and release their juices over time. However, if you have any leftovers, you can store them in an airtight container in the refrigerator for up to two days. To serve the salad, you can either bring it to room temperature or enjoy it cold.

If you're looking for a new way to spice up your morning routine, you'll love this recipe for Roasted Eggplant Harissa Shakshuka. It's a hearty and flavorful dish that features eggs cooked in a rich and smoky tomato sauce with roasted eggplant and harissa paste. Harissa is a North African chili paste that adds a kick of heat and depth of flavor to any dish. Eggplant is a versatile vegetable that roasts beautifully and absorbs the sauce.
Shakshuka is a traditional Middle Eastern dish that originated in Tunisia and spread across the region. It's a popular breakfast dish, but it can also be enjoyed for brunch, lunch, or dinner. It's typically made with eggs poached in a spicy tomato sauce with onions, peppers, and spices. Roasted Eggplant Harissa Shakshuka is a variation that adds roasted eggplant and harissa paste to the sauce, creating a more complex and satisfying flavor. It's a great way to use up any leftover eggplant or harissa you have in your fridge.
You can customize this recipe to suit your preferences and dietary needs. Here are some suggestions for substitutions and customizations:
You can store the leftover shakshuka in an airtight container in the refrigerator for up to 3 days. To reheat, you can either microwave it for a few minutes or heat it in a skillet over low-medium heat until warm. You can also reheat it in the oven at 350°F for 10 to 15 minutes, covered with foil.
You can freeze the sauce without the eggs for up to 3 months. To do so, let the sauce cool completely and transfer it to a freezer-safe container or ziplock bag. Label and date the container and freeze. To use, thaw the sauce in the refrigerator overnight or in the microwave for a few minutes. Then, heat it in a skillet over medium-high heat until bubbling. Make wells in the sauce and crack the eggs into them. Cover the skillet with a lid and cook until the eggs are done to your liking. Sprinkle the cheese and parsley over the top and serve with pita bread.

If you’re looking for a simple and satisfying vegetarian meal that is packed with protein, fiber, and vitamins, look no further than this Cheesy Cannellini and Swiss Chard Bake. It’s a great way to use up any leftover beans or greens you have in your fridge or pantry, and it’s also budget-friendly and easy to make.
This dish is inspired by the Italian cuisine, where beans and greens are often paired together in soups, stews, and salads. In this recipe, the beans and greens are cooked in a flavorful tomato sauce that is made from scratch with fresh tomatoes, garlic, onion, and herbs. The sauce is then mixed with the beans and chard and transferred to a baking dish. The cheese is sprinkled on top, and the dish is baked until the cheese is melted and browned. The result is a warm and comforting dish that is filling and nutritious.
This dish is very versatile and can be adapted to your preferences and dietary needs. Here are some suggestions for substitutions and customizations:
This dish can be stored in an airtight container in the refrigerator for up to 4 days, or in the freezer for up to 3 months. To reheat the dish, you can either microwave it in a microwave-safe dish, or bake it in a preheated oven at 350°F until heated through. If the dish is frozen, you will need to thaw it in the refrigerator overnight before reheating it. You can also reheat individual portions of the dish in a toaster oven or an air fryer.
Freezing and Reheating

There’s something about cinnamon rolls that makes me feel warm and happy. Maybe it’s the smell of cinnamon and sugar filling the air, or the soft and fluffy texture of the dough, or the gooey and sweet glaze on top. Whatever it is, I can never resist a freshly baked cinnamon roll.
But making cinnamon rolls from scratch can be a hassle. You have to make the dough, let it rise, roll it out, fill it, cut it, let it rise again, and then bake it. That’s a lot of work and time, especially if you’re hungry or in a hurry.
That’s why I love this recipe for apple or pear butter cinnamon rolls. It uses frozen bread dough and store-bought apple or pear butter, which are both easy to find and use and cuts the traditional cinnamon roll process down to just over an hour!
The apple or pear butter adds a wonderful flavor and moisture to the cinnamon rolls, making them extra soft and tender. You can use either apple or pear butter, depending on your preference or availability. They both taste great and complement the cinnamon well.
This recipe is very versatile and adaptable, so you can make some changes according to your taste or dietary needs. Here are some suggestions:
These cinnamon rolls are best enjoyed fresh, but you can also store them in an airtight container at room temperature for up to 2 days, or in the refrigerator for up to 5 days. To reheat them, you can microwave them for 10 to 15 seconds, or bake them in the oven for 5 to 10 minutes at 350°F.
If you want to make these cinnamon rolls ahead of time, you can freeze them before or after baking. Here’s how:

If you're looking for a new way to enjoy pasta, you'll love this lemony orzo with roasted vegetables and grilled halloumi. It's a simple dish that's packed with flavor and texture, and it comes together in less than an hour. You'll start by cooking the orzo and tossing it with a zesty lemon dressing. Then you'll roast some zucchini, bell pepper, cherry tomatoes, and chickpeas in the oven until they're tender and charred. Finally, you'll grill some slices of halloumi cheese, a firm and salty cheese that's amazing when cooked. The result is a colorful and satisfying dish that's great for lunch or dinner.
Halloumi is a type of cheese that originated in Cyprus, but is now popular in many parts of the world. It's made from a mixture of sheep's and goat's milk, and sometimes cow's milk as well. It has a high melting point, which means it can be grilled, fried, or baked without losing its shape or texture. It has a chewy and squeaky texture, and a salty and tangy flavor. It's often served as an appetizer, salad topping, or sandwich filling, but it also works well as a main course.
If you want to make this recipe vegan, you can omit the cheese and add some pan-fried tofu or tempeh instead. If you’re feeling creative, you can also check out this recipe for homemade vegan halloumi made by marinading firm tofu before you fry it. https://thehiddenveggies.com/vegan-halloumi/
If you want to make this recipe gluten free, you can use gluten free orzo or substitute it with another gluten free grain, such as quinoa, rice, or millet.
This dish can be stored in an airtight container in the refrigerator for up to 4 days. To reheat, you can microwave it for a few minutes, or heat it in a skillet over medium heat, stirring occasionally. You can also enjoy it cold or at room temperature, as a salad or a snack.

If you’re like us, you probably end up with a ton of berries in your fridge every summer. Maybe you picked them yourself, or maybe you bought them at the farmers market or the grocery store. Either way, you need a way to use them up before they go bad, right?
Well, look no further than this freezer friendly mixed berry cobbler to preserve those amazing, ripe berries to enjoy all year round. It’s one of our favorite desserts to make with berries, because it’s so easy and delicious. You just toss the berries with some sugar, cornstarch, lemon juice, and vanilla, and then spread them in a baking dish. Then you make a simple dough with flour, sugar, butter, and boiling water, and drop it over the berries. Bake it until golden and bubbly, and voila! You have a scrumptious cobbler that is bursting with juicy berries and topped with a crispy crust.
This recipe is adapted from the peach cobbler recipe from Pinch of Yum, which we love so much. The topping is the best part, because it’s incredibly easy to make, and turns out buttery, sweet, and crunchy. It goes so well with the soft and tart berries. You can serve this cobbler with whipped cream or ice cream, or just enjoy it plain. It’s amazing either way.
One great thing about this recipe is that you can easily scale it up to make as many cobblers as you want. You can easily find disposable 8x8 inch pans that are perfect for making multiple cobblers at once, and even gifting a few to friends and family without having to ask for your pans back later. This is a great way to preserve your berry bounty for later and have a warm and cozy dessert anytime you want.
You can use any kind of berries for this cobbler, but we recommend using a mix of different types for more flavor and texture. Some berries that work well are blueberries, raspberries, blackberries, strawberries, cherries, cranberries, and currants. You can also use frozen berries, but do not thaw them before adding them to the baking dish. You may need to increase the baking time by 5 to 10 minutes if using frozen berries.
You can store the leftover cobbler in an airtight container in the refrigerator for up to 3 days, or in the freezer for up to 3 months (see recipe below for instructions). To reheat the cobbler, you can microwave it for a few seconds, or bake it in a 350°F oven for 10 to 15 minutes, or until warm. You can also reheat individual servings in a toaster oven or an air fryer for a crispier topping.
For the Filling:
For the topping:

Shepherd’s pie is a staple of British and Irish cuisine and has many variations around the world. The basic idea is to use up leftover meat and vegetables by covering them with mashed potatoes and baking them in the oven until golden and bubbly.
However, you don't need to wait for leftovers to make shepherd's pie. You can also make it from scratch with fresh ingredients, which will give you more control over the flavor and texture of the dish. In this recipe, we use lean ground beef, onion, garlic, carrot, peas, corn, and celery for the filling, and season it with Worcestershire sauce, thyme, salt, pepper, and beef broth. We also use fresh potatoes for the topping, and mash them with butter, milk, nutmeg, and cheese.
One thing to note is that technically, this dish has different names depending on the type of meat you use. If it’s made with lamb, it’s called shepherd’s pie, whereas if it’s made with beef it’s a cottage pie. However, many people use the terms interchangeably, and both dishes are equally delicious. So, feel free to call it whatever you like, as long as you enjoy it!

You can easily customize this dish to suit your preferences and dietary needs. Here are some suggestions:
You can store the leftover shepherd's pie in an airtight container in the refrigerator for up to 3 days. reheat it, you can either:
If you want to make the shepherd's pie ahead of time and freeze it for later, you can follow these steps:
Prepare the filling and the topping as instructed, but do not bake them. Spoon the filling into a freezer-safe baking dish and spread it evenly. Spoon the topping over the filling and spread it evenly. Sprinkle the cheese over the top. Cover the baking dish tightly with plastic wrap and aluminum foil, and label it with the name and date of the dish. Freeze the unbaked shepherd's pie for up to 3 months.
When you're ready to bake it, thaw it in the refrigerator overnight. Preheat the oven to 375°F and remove the plastic wrap and foil from the baking dish. Bake the shepherd's pie for 25 to 30 minutes, or until golden and bubbly.

If you're looking for a simple and tasty weeknight dinner that doesn't require a lot of dishes or prep time, this Sheet Pan Pork Tenderloin with Potatoes and Green Beans is the perfect choice. All you need is a large baking sheet, a sharp knife, and a few basic ingredients. In less than an hour, you'll have a mouthwatering meal that's packed with protein, fiber, and flavor. Plus, it's a great way to use up any leftover veggies you have in your fridge or pantry.
This recipe is very versatile and can be adapted to suit your preferences or simply what you have on hand. Here are some ideas for substitutions and customizations:
This dish makes great leftovers that can be enjoyed for lunch or dinner the next day. Here's how to store and reheat them:

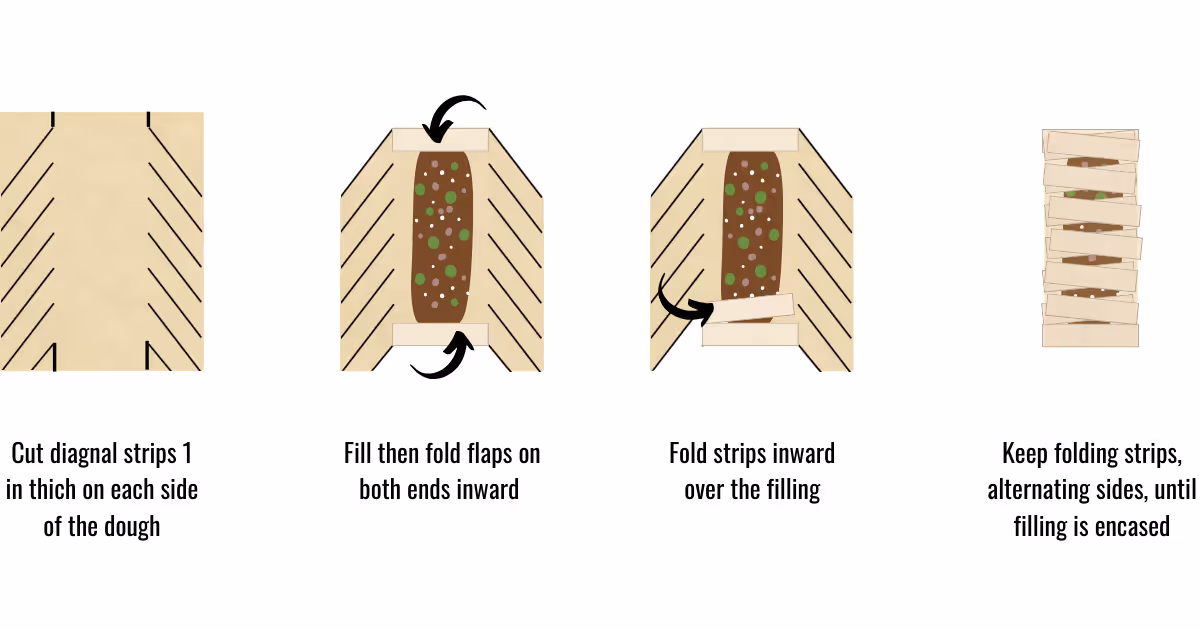
This fall vegetable strudel is a simple and satisfying dish that can be made in less than an hour, with minimal prep work and ingredients. All you need is some frozen puff pastry, bacon, onion, cheese, and of course, the star ingredients: brussel sprouts and butternut squash. Just sauté the veggies, then layer them with the bacon, onion, and cheese on the puff pastry, and fold it into a strudel shape. After baking, you'll have a crispy and cheesy strudel that's bursting with flavor and texture. It's a great way to enjoy the fall and winter bounty, and impress your family and friends with your baking skills.
Creating the braided effect on this strudel may look complicated, but it’s really not. Begin by rolling your pastry out on a lightly floured surface. Then, cut diagonal strips about 1 in thick on each side of the pastry, leaving the middle 1/3 of the pastry intact and creating 2 small flaps on each end. Place filling in center 1/3 of the pastry, then fold each of the end flaps up over the filling. Begin folding the strips over the filing, alternating sides, to create a braid.
Of course, if you don’t want to do the braid, you can always just cut the dough in half, put the filling on the bottom half, lay the other half on top, and crimp the edges on the dough with a fork.

This vegetable strudel can be stored in an airtight container in the refrigerator for up to 3 days. To reheat, bake it in a 375°F oven for 10 to 15 minutes, until warm and crisp.
These strudels freeze beautifully. Since store-bought puff pastry comes with 2 sheets per pack, I always make 2 at a time and freeze the second one for later.
To freeze, prepare it up until the point of baking it. Flash freeze on a parchment lined baking sheet for a few hours until frozen all the way through. Wrap it tightly in plastic wrap, then seal in a freezer bag.
To bake, preheat the oven to 400° F and bake the frozen (no need to defrost here) strudel on a baking sheet for 30 – 40 minutes until golden brown and heated all the way through.

If you're looking for a way to start the new year with a bang, you might want to try this black-eyed peas with collard greens and ham hock recipe. This dish is not only tasty, but also lucky. According to folklore, eating black-eyed peas on New Year's Day symbolizes coins, collard greens symbolize bills, and ham hock symbolizes wealth and abundance. Whether you believe in this superstition or not, you'll surely enjoy this satisfying and comforting dish.
One of the best things about this recipe is that it's very budget friendly and freezes well. You can make a large batch of it with dried beans, which are cheaper and more nutritious than canned ones, and a few other ingredients that you probably already have in your pantry. You can freeze the leftovers in individual portions and reheat them whenever you need a quick and easy meal.
This recipe makes enough for 12 servings, so you might have some leftovers. You can store them in an airtight container in the refrigerator for up to 4 days, or in the freezer for up to 3 months. To reheat, you can microwave them in a microwave-safe bowl, stirring occasionally, until hot. Or, you can transfer them to a pot and heat them over medium-low heat, stirring occasionally, until hot. You might need to add some water or broth to thin out the stew if it's too thick.

Most people are familiar with the classic potato gratin, but when zucchini is in season, it makes a fantastic swap for those potatoes. Zucchini shines in a gratin, bringing lovely flavors and added nutrients for an interesting twist on the classic dish.
To make zucchini gratin, you only need a few basic ingredients: zucchini, butter, garlic, flour, milk, salt, pepper, nutmeg, and cheese. The result is a cheesy and delicious zucchini gratin that is tender, creamy, and flavorful. You can enjoy it as a side dish with meat, poultry, or fish, or as a vegetarian main course with a salad or bread. It's a great way to use up your zucchini and add more veggies to your diet.
One of the best things about zucchini gratin is that you can customize it to your taste and preferences. Here are some ideas for substitutions and customizations that you can try:
If you have leftovers, you can store them in the refrigerator or freezer and reheat them later. Here are some tips for storing and reheating zucchini gratin:

Have you ever found yourself with half a head of cabbage leftover from another recipe and no idea what to do with it? (I swear, they keep growing in the fridge when you’re not looking) This Spicy Mustard Slaw a great way to use up that leftover cabbage, and it's also a good source of vitamin C, fiber, and antioxidants.
This slaw is perfect for busy weeknights and hot days when you don't feel like turning on the stove or oven. You can whip it up in just 15 minutes and let it chill in the fridge until you're ready to serve. It goes well with grilled meats, sandwiches, burgers, or even on its own as a light lunch or snack.
One of the best things about this slaw is that you can easily customize it to suit your taste buds and dietary preferences. Here are some ideas for how to make it your own:
This slaw can be stored in an airtight container in the refrigerator for up to 3 days. You can enjoy it cold or at room temperature.

There's nothing like a warm bowl of soup to warm you up on a chilly day. But sometimes, you want something more filling and substantial than a thin broth. That's where this slow cooker vegetable barley stew comes in. It's a hearty and healthy meal that will keep you satisfied for hours.
This stew isn’t just tasty, it’s also packed with nutritious ingredients. You'll get plenty of vitamins, minerals, and antioxidants from the colorful vegetables, such as onion, garlic, carrots, celery, mushrooms, and green beans. You'll also get a boost of plant-based protein and fiber from the cannellini beans and barley, which make this stew thick and creamy. And you'll love the savory and smoky flavor from the herbs and spices, such as thyme, bay leaves, and smoked paprika.
The best part is that you can make this stew in your slow cooker, which means you don't have to spend a lot of time in the kitchen. Just sauté the vegetables in a skillet, then transfer them to the slow cooker along with the rest of the ingredients. Then, let the slow cooker do its magic, and come back to a pot of delicious stew that's ready to eat. You can serve it with some crusty bread for a cozy and comforting meal that everyone will love!
One of the great things about this stew is that you can easily modify it to suit your taste and preferences. Here are some suggestions for how you can change it up:
This stew makes a large batch, so you'll likely have some leftovers. Here's how you can store and reheat them:

Nothing beats a warm stew on a cold wintery night. Beef bourguignon combines melt in your mouth beef and tender vegetables with a rich sauce to create one of the coziest meals you can imagine.
This classic French dish is usually made on the stovetop or in the oven, but I’ve simplified it by using a slow cooker. You just need to brown the beef and bacon and then dump everything in the slow cooker. The result is a mouthwatering stew that is full of flavor and texture. You can serve this with some crusty bread or over noodles, rice, or mashed potatoes. It’s a hearty and satisfying meal that will warm you up on a cold day.
You can store the leftovers in an airtight container in the refrigerator for up to 4 days or in the freezer for up to 3 months. To reheat, thaw the frozen stew in the refrigerator overnight or in the microwave on the defrost setting. Then, transfer the stew to a pot and bring to a boil over medium-high heat, stirring occasionally. Alternatively, you can reheat the stew in the microwave in a microwave-safe dish, stirring every few minutes, until hot.

If you love noodles, you will love this recipe for Shanghai Fried Noodles (Cu Chao Mian). This is a classic dish from China that features stir-fried noodles with tender pork, crunchy bok choy, and a flavorful sauce. It is simple to make, yet packed with taste and texture. You can use fresh or dried noodles, and customize the dish with your favorite vegetables and meat.
Shanghai Fried Noodles is a great dish to enjoy any time of the day. It is filling, satisfying, and comforting. You can whip it up in less than 30 minutes, and serve it hot or cold. It is also a wonderful way to use up any leftover noodles or meat that you have in your fridge. Once you try this recipe, you will want to make it again and again!
Shaoxing wine is a special ingredient that can elevate your Chinese dishes to a new level of deliciousness. It is a type of rice wine that comes from Shaoxing, a city in eastern China that is famous for its rich culture and history. Shaoxing wine has a deep amber hue, a sweet and fragrant scent, and a smooth and complex taste. It is not only a drink, but also a cooking wine that adds a touch of magic to many Shanghai-style dishes, such as drunken chicken, kung pao chicken, and Shanghai fried noodles.
If you don’t have Shaoxing wine, don’t worry. You can still make tasty dishes with some alternatives. The best one is dry sherry, which has a similar flavor and color to Shaoxing wine. You can also use dry white wine or sake, but they may not have the same depth and richness as Shaoxing wine. Avoid using cooking wine or vinegar, as they have added salt or acidity that may ruin your dish. If you are gluten-free, you can use gluten-free rice wine or mirin, but you may need to adjust the sugar or salt in your recipe, as they are sweeter than Shaoxing wine.
This recipe can easily be adapted to be 100% plant-based. You’ll want to swap out the pork for some sliced mushrooms or cubed extra-firm tofu and replace the oyster sauce with a 1:1 mix of hoisin & soy sauce.
For a gluten-free version, you’ll want to substitute the soy sauce in both the marinade and the sauce with either tamari or liquid aminos. For the noodles, look for thicker, round rice, buckwheat, or starch noodles, such as soba, mi xian, or shirataki.

Crispy, rich pork and tangy, spicy slaw come together to make one fantastic taco! The carnitas are slow cooked until it practically falls apart, then pan fried to give it a crispy outside. The slaw adds a refreshing and spicy kick to the rich and savory carnitas. Together, they make a perfect filling for tacos.
The best way to store leftover carnitas is to keep them in an airtight container in the refrigerator for up to three days. To reheat carnitas, you have several options, depending on your preference and the tools you have available. Here are some of the most common methods:
Oven: This method helps to preserve the crispiness of the carnitas. Preheat your oven to 350°F and place your carnitas in an oven-safe dish. Cover the dish with foil and bake for 10-15 minutes, or until heated through. Then, remove the foil and bake for another 5-10 minutes, or until crispy4.
Stovetop: This method is faster than the oven method, but may not produce as crispy results. Place your carnitas in a skillet and add a tablespoon of oil or water to prevent them from drying out. Heat over medium heat, stirring occasionally, for 5-10 minutes, or until heated through.
Microwave: This method is the quickest, but can also lead to dry meat. Place your carnitas in a microwave-safe dish and cover with a lid or paper towel. Heat on high for 30 seconds to 1 minute, stirring in between, until heated through.
You can’t freeze the slaw, but you can definitely double the carnitas recipe and freeze the leftovers. You’ll want to freeze them after you’ve slow cooked and shredded the pork, but before you pan fry it. Freeze the shredded pork along with the cooking liquid. To reheat, fully defrost the meat then fry as instructed in the recipe below, being sure to drizzle some of the liquid onto the meat as it fries.
For the Slaw:

Egg rolls are a must have any time we order Chinese food. Nothing beats that golden, crispy shell filled with flavorful sautéed vegetables.
Making egg rolls at home is not as hard as you might think. You can use store-bought egg roll wrappers to wrap up your sautéed vegetables then either fry or bake them to golden perfection. The filling is also easily customizable and can be made with whatever vegetables and meat you have on hand.
There are two ways to cook egg rolls: frying and baking. Both methods have their pros and cons, and the result will be slightly different in taste and texture.
Frying egg rolls is the traditional way to cook them, and it gives them a golden and crispy exterior. Frying also seals the wrappers and prevents them from getting soggy. However, frying requires more oil and can make the egg rolls greasy and high in calories. Frying also takes more time and attention, as you have to fry the egg rolls in batches and keep an eye on them to prevent burning.
Baking egg rolls is a healthier and easier alternative to frying. Baking uses less oil and makes the egg rolls lighter and lower in fat. Baking also saves time and effort, as you can bake all the egg rolls at once and leave them in the oven until they are done. However, baking does not make the egg rolls as crispy and crunchy as frying, and they may dry out or crack if overbaked.
One of the best things about making egg rolls at home is that you can use whatever ingredients you like for the filling. The version here is vegetarian, made with green cabbage, carrots, mushrooms, and broccoli, but you can easily swap out the mushrooms with some diced, cooked pork. I also like to use a mix of red and green cabbage when I have both for a more colorful filling. And, when kohlrabi is in season, it makes an excellent substitution for the broccoli. Other vegetables like bean sprout, bamboo shoots, and water chestnuts make great additions that add a delightful crunch.
Before storing, let the egg rolls cool completely, then store in an air-tight container for up to 3 days. To reheat, bake 375°F for 10 - 15 minutes, flipping halfway through.
You can also freeze your leftover egg rolls for later. They can be frozen either before or after you cook them. I personal prefer freezing them before cooking because they come out much crispier that way.
To freeze them, place them on a baking sheet lined with parchment paper (let them cool completely if you cooked them first). Flash freeze for 2 - 3 hours, then transfer to a freezer bag.
To reheat frozen cooked egg rolls, bake from frozen at 375°F for 20 - 25 minutes, flipping halfway through. Don't defrost them first or they'll get soggy.
For the uncooked frozen egg rolls, it's best to fry them vs baking them. Just fry them using the frying instructions below, again not defrosting them before you fry them.

In the peak of CSA season, you may find yourself with more fresh veggies than you know what to do with. One easy solution for using up all of that fresh produce is to roast or grill them, but even then, you might find yourself with a fridge full of leftovers. Instead of letting it go to waste, toss those lovely vegetables into a quiche for a quick and nutritious breakfast!
The beauty of dishes like quiches and frittatas is that almost anything goes! You can use just about any combination for vegetables, cheese, and you can even toss in some leftover meat for an added flavor and protein boost.
Most roasted, grilled, or sauteed vegetables work well in a quiche. Starchy root vegetables may make the dish a little too heavy, so use those sparingly. For the quiche pictured in this recipe, I had leftover sauteed brussel sprouts and butternut squash from a recipe I’d made the night before. Here are some suggestions from what I’ve used in the past with a lot of success:
No sweat! You can use a store-bought pie crust for this, or skip the crust entirely. The cooking instructions are the same for a crustless quiche, you just leave out steps for the crust.
A quiche is a great dish to make ahead and enjoy later. You can store the leftover quiche in an airtight container in the refrigerator for up to 3 days. The best way to reheat it is to pop it into a 350°F oven for 10 to 15 minutes, until warm and crisp. You can also microwave it for a few minutes, but this tends to make the crust a little soggy.
Quiches freeze beautifully! If you are using store-bought crusts, they come 2 to a pack, so I tend to make 2 quiches at a time and freeze one for later. To freeze, you should let the quiche cool completely, then wrap it tightly in plastic wrap and aluminum foil. You can freeze the whole quiche or cut it into individual slices. To reheat the frozen quiche, you can either thaw it overnight in the refrigerator and then follow the same steps as above for reheating the leftovers, or bake it directly from frozen in a 375°F oven for 25 to 30 minutes, until hot and golden.

Onions. You love them, but what do you do when you get a few more in your CSA box than you can typically use up? The answer is both simple and delicious; make onion confit!
Onion confit is a delectable way to transform ordinary onions into a sweet and savory jam that can elevate any dish. It is made by slowly braising onions with red wine until they become soft, caramelized, and jammy.
There are several ways that you can add a twist to your onion confit. Try addining in some fresh jalapenos for a sweet and spicy version. Sautee the onions in bacon grease or even duck fat for a richer, savory flavor. Or, toss in some freshly grated ginger.
To store onion confit in the fridge, you can transfer it to an airtight container and keep it for up to two weeks.
To store it in the freezer, you can portion it into small freezer bags or containers and freeze it for up to six months. To thaw it, you can either microwave it for a few seconds or let it thaw in the fridge for a few hours.
If you are looking for a delicious and easy vegetarian dish that can impress your guests, look no further than this leek, mushroom, and goat cheese strudel. This recipe combines the savory flavors of leeks, mushrooms, and goat cheese with the crispy and flaky texture of puff pastry. It is a perfect dish for brunch, lunch, or dinner, and can be served with a simple salad or some roasted vegetables.
With a few substitutes, you absolutely can make this vegan. There are plant-based puff pastries available on the market, but if you can’t find one, you can easily use filo dough instead. You’d simply wrap the filling in several layers of filo without cutting the strips to create the braided effect.
There are also several plant-based goat cheese options as well, and you can sub out the butter with any oil of your choice and brush the dough with a plant-based milk in place of the egg wash before baking.
Yes! These strudels freeze beautifully. Since store-bought puff pastry comes with 2 sheets per pack, I always make 2 at a time and freeze the second one for later.
To freeze, prepare it up until the point of baking it. Flash freeze on a parchment lined baking sheet for a few hours until frozen all the way through. Wrap it tightly in plastic wrap, then seal in a freezer bag.
To bake, preheat the oven to 400° F and bake the frozen (no need to defrost here) strudel on a baking sheet for 30 – 40 minutes until golden brown and heated all the way through.
Creating the braided effect on this strudel may look complicated, but it’s really not. Begin by rolling your pastry out on a lightly floured surface. Then, cut diagonal strips about 1 in thick on each side of the pastry, leaving the middle 1/3 of the pastry intact and creating 2 small flaps on each end. Place filling in center 1/3 of the pastry, then fold each of the end flaps up over the filling. Begin folding the strips over the filing, alternating sides, to create a braid.
Of course, if you don’t want to do the braid, you can always just cut the dough in half, put the filling on the bottom half, lay the other half on top, and crimp the edges on the dough with a fork.
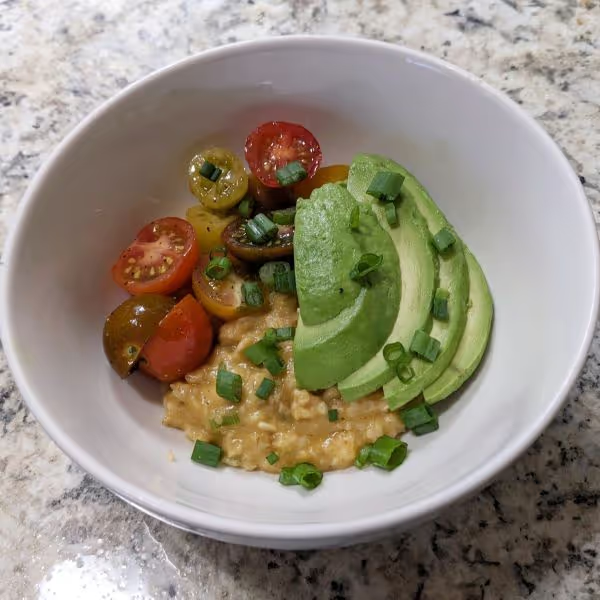
Yes, you read that right. This is a savory oatmeal! And really, it’s not as strange as you may think. The taste and texture isn’t far off from cheesy grits, which has been a staple of Sothern breakfast tables for generations.
Savory oatmeal is not a new invention, but rather a revival of an ancient and traditional way of eating oats in many cultures around the world. The Scotts, Germans, and Scandinavians have all been eating variations of savory oatmeal for centuries.
Great question! Aside from the fact that it is absolutely delicious, it’s also rich in protein, fiber, and complex carbohydrates, which can keep you full and energized for longer. Plus, it’s super quick and easy to make, and is incredibly customizable. This recipe here calls for the oatmeal to be topped with tomatoes and avocado, but you could use just about any veggie you like, or add meat or a fried egg to get even more of a protein boost.
Yep! To make it vegan, you’d simply choose a plant-based fat to sauté the onion and garlic in and swap out the cheese for 1 tbsp of nutritional yeast.
You absolutely can, though you’ll want to be sure to use the quick cooking steel cut oats and increase the cooking time to 5 – 7 minutes.
To store any leftovers, or if you’re doing meal prep for the week, divide the cooked oatmeal into small containers in your desired portions. Place the toppings in separate containers. Once the oatmeal is cool, place it and the toppings in the fridge.
To reheat, microwave on high for 1 minute, stir, then microwave for another minute. Add your toppings and enjoy!

Nothing evokes memories of summer days and childhood joys quite like strawberry shortcake. The flavor of ripe, juicy strawberries enveloped in rich whipped cream is such a classic. It’s so simple yet deeply satisfying.
This recipe takes all of those classic flavors and gives it an elegant twist by rolling them up in a simple sponge cake to create a stunning presentation that is sure to impress your guests!
You could easily use any strawberries you have frozen from the previous season. Or, if you opted to make jam instead of freezing your berries, you can use that too. You’ll just want to spread the jam first followed by the whipped cream.
While I haven’t personally tried it, this cake would probably be a good candidate for swapping out the all-purpose flour with almond flour. One thing to note is that almond flour is a little denser than wheat flour, so it often requires a little more liquid to get the consistency right. You may need to add an additional egg white if you try using almond flour.
Since we took the extra steps to stabilize the whipped cream, this cake will keep well, wrapped tightly and stored in the fridge, for up to 3 days.
For macerated berries:
For the cake:
For the stabilized whipped cream:

If you’re looking for something a little different for breakfast that combines the vibrant flavors of fresh vegetables with the richness of eggs, then migas are definitely your answer. Migas are made with crispy pieces of corn tortillas that are scrambled with eggs and various ingredients, such as cheese, onion, tomato, jalapeño, and avocado. They have a wonderful balance of flavors, textures, and colors, and they can be easily customized to your liking.
This recipe specifies that it’s Mexican migas for a reason. This dish actually originated in Spain, where stale bread is crumbled and then fried, often along with a variety of meats, and could be served with either scrambled or fried eggs. The two versions are vastly different.
As previously mentioned, this dish is highly versatile. You can swap out the veggies here for anything you have on hand that sautés well and use any kind of cheese and salsa you like. Boost the protein here by adding some black beans (my personal favorite) or cooked chorizo.
It can also be made vegan by omitting the eggs and milk for drained, crumbled firm tofu. You can use regular or gluten free corn tortillas. And, if you’re watching your cholesterol levels, you can replace some or all of the whole eggs for egg whites.
You can store the leftovers in an air-tight container in the fridge for a few days, though I find that the tortilla strips tend to lose their crisp and get soggy. They really are best eaten right away.
8 large eggs
2 tbsp milk
½ tbsp paprika
2 tbsp neutral oil
2 corn tortillas, cut into 2" strips
1/2 yellow onion, finely diced
1 jalapeno pepper, seeds and veins removed, finely diced
1 red bell pepper, diced
½ tsp salt
¼ cup shredded cheese (I prefer either shredded queso Oaxaca or crumbled cotija, but shredded cheddar or pepper jack work great as well)
1 avocado, sliced
1 Tablespoon chopped cilantro
Salsa of your choice

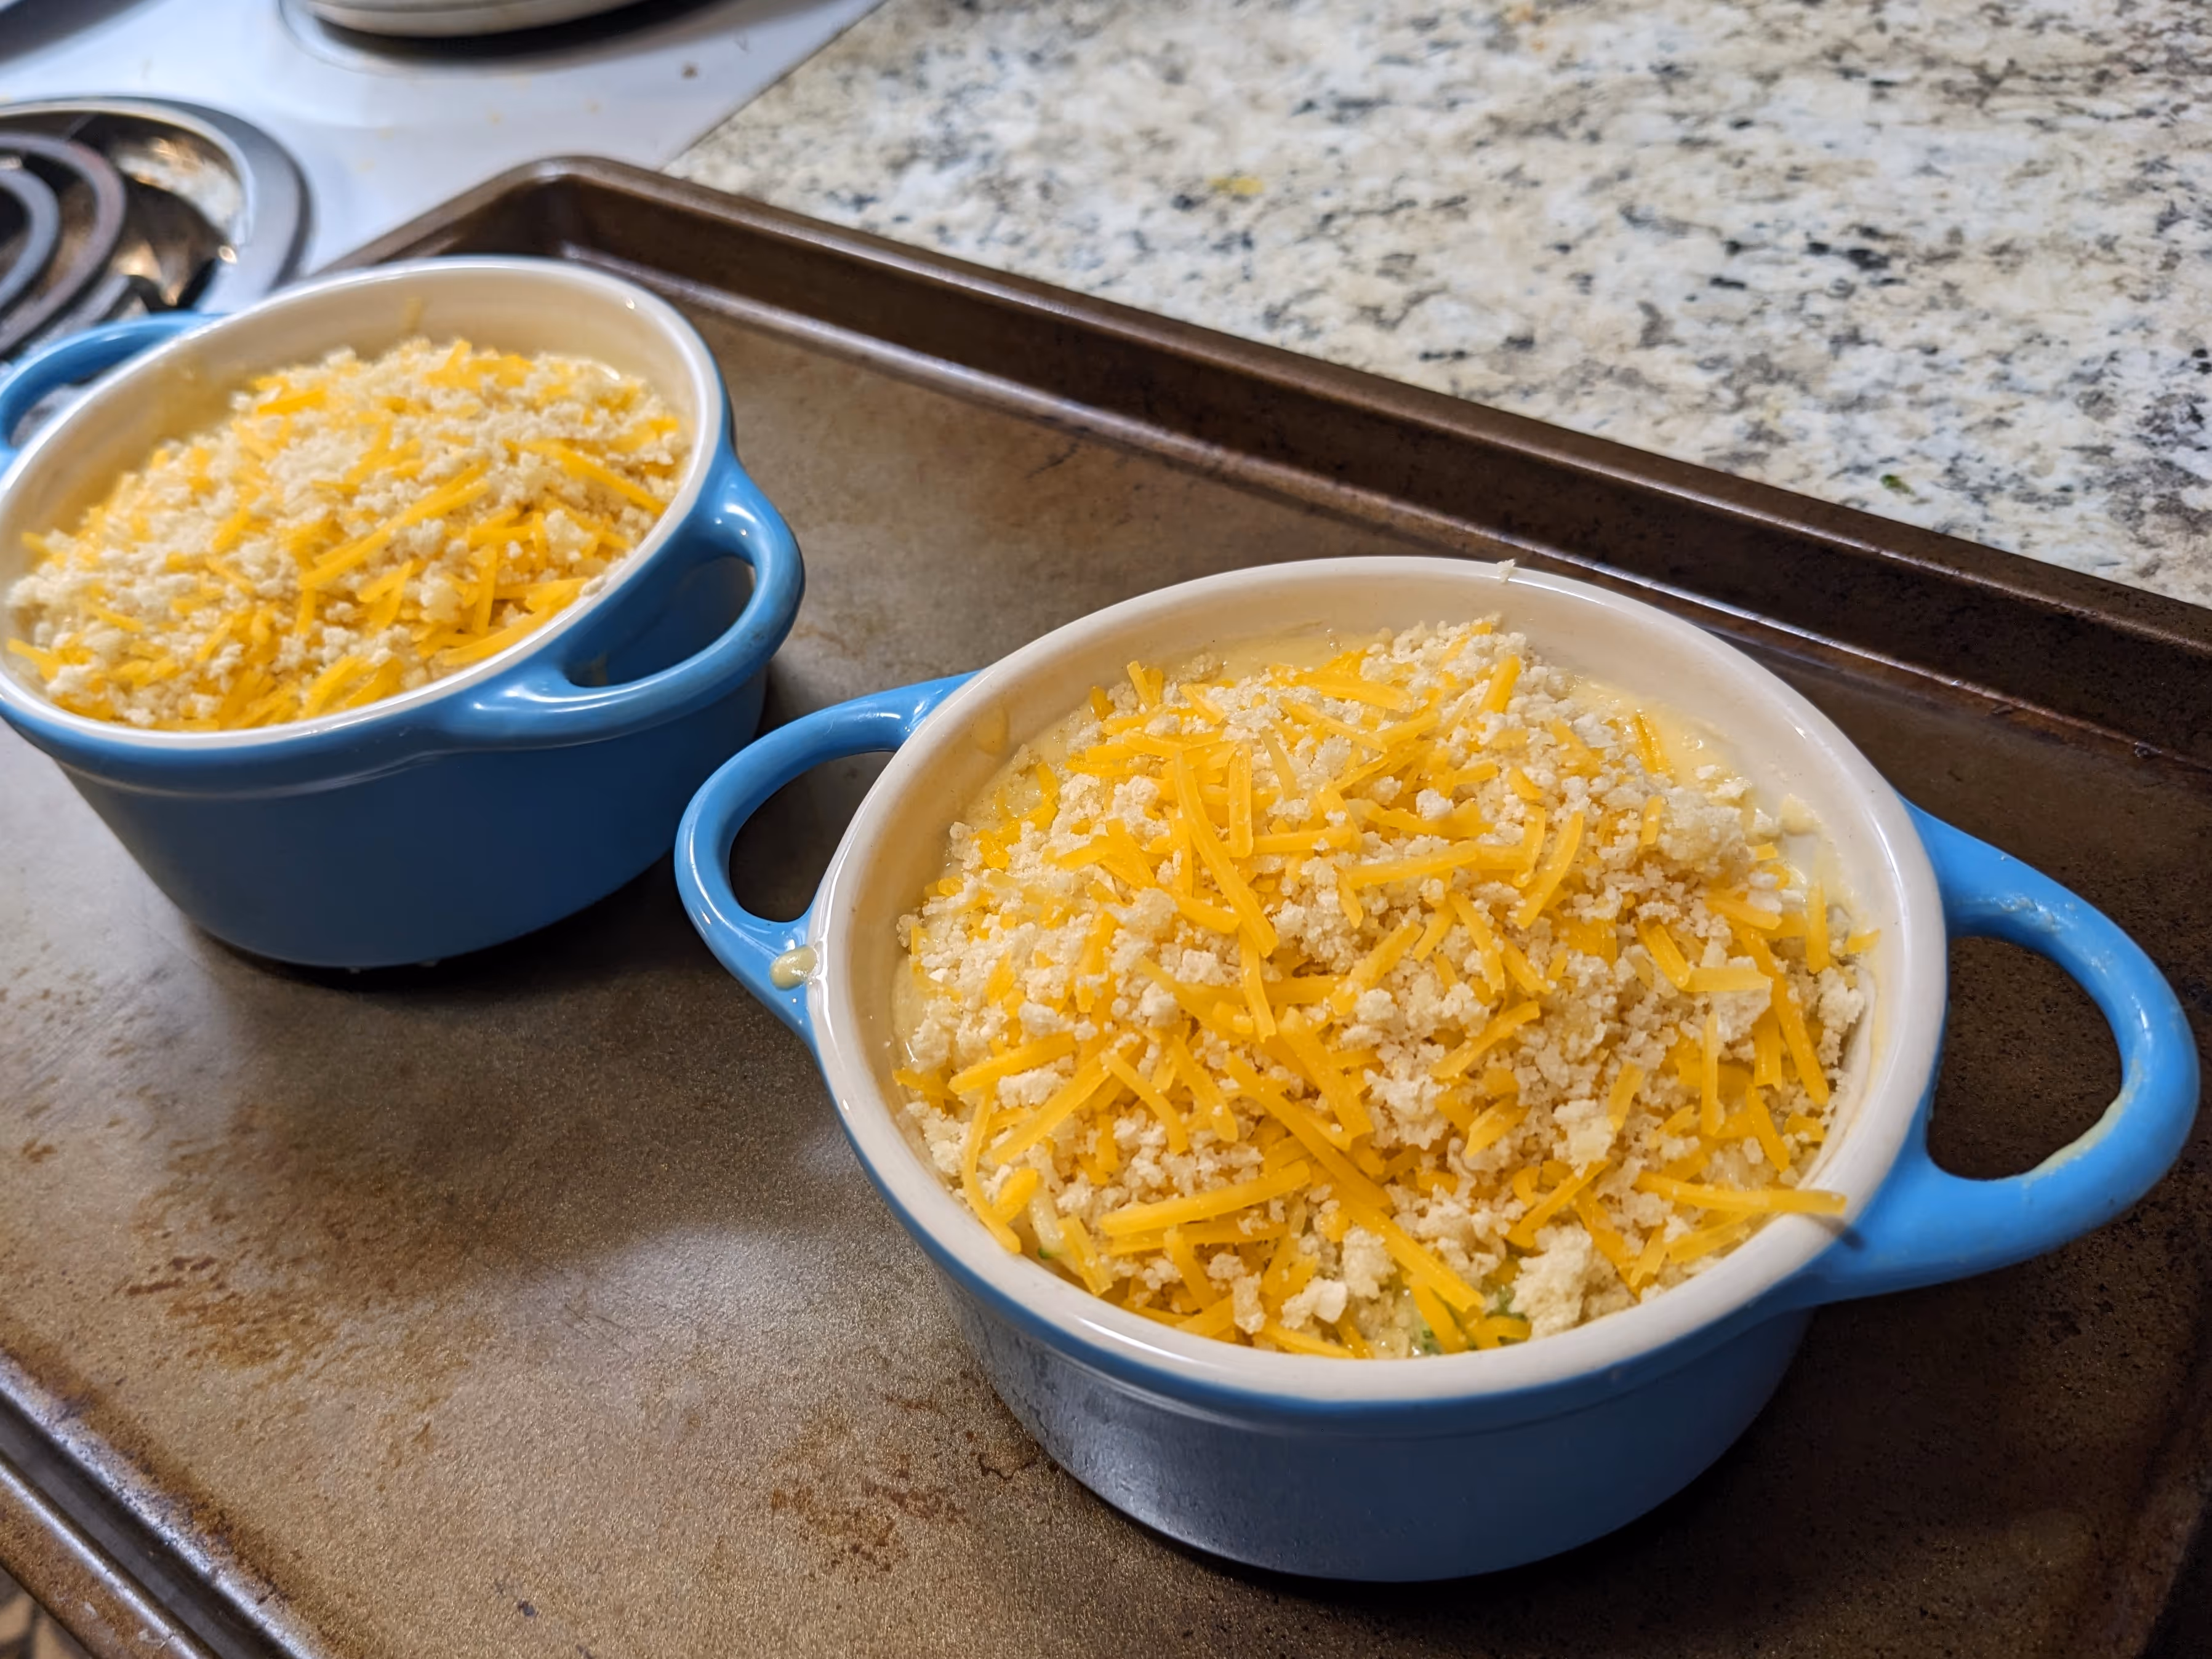
Is Broccoli Mac & Cheese the ultimate comfort food? Let’s see;
✅ Rich and gooey sauce
✅ Crispy crunchy topping
✅ The dynamic duo of broccoli and cheddar cheese
Sure does seem like it! It checks all of my own boxes for a cozy and nostalgia filled meal.

Great news, folks! Mac & cheese is one of the most easily customizable dishes! So long as you have a cheese sauce, some sort of pasta that will hold the sauce well, and a crispy topping, you really can toss anything else in there that you like. You can even add some meat or play around with different cheese combinations. Just keep in mind that you want to use a cheese that both has a strong flavor and will melt well, otherwise you’ll end up with a sad, broken sauce.
Here are some of my favorite combinations;
Roasted Veggie: use an equivalent volume of roasted bell peppers, mushrooms, and zucchini for the broccoli and use fontina in place of the cheddar. Omit the nutmeg from the sauce and use 1 tsp of sweet paprika in its place.
Southwest: Use a combination of roasted red peppers, green chilis, and black beans in place of the broccoli. Swap out the nutmeg for 1 tsp smoked paprika. Toss in a bit of cayenne if you like it spicy.
Spinach and Mushroom: Stir some sautéed mushrooms and raw spinach into the cheese sauce. Use a mix of equal parts sharp white cheddar and gruyere for the sauce.
Bacon and Brussels: Add in halved & roasted brussel sprouts and some chopped, cooked bacon. Use gouda in place of the cheddar for the sauce.
Roasted Tomato: Stir in a pint of halved and roasted tomatoes along with some chiffonade basil. Use a mix of white cheddar and gruyere for the sauce.
Any pasta shape that the rich cheesy sauce can cling to will work here. There’s always the classics like elbow macaroni and shells, but spiral pastas like fusilli or cavatappi, tubes like penne or rigatoni, or curled/cupped shapes like campanelle or orecchiette.
Not only can you, but you absolutely should! This makes a pretty large batch, and if you’re a household of only 1 – 2 people, working your way through the leftovers can be a bit much. Luckily, you can split the batch between 2 8x8 baking dishes and pop one in the oven, the other in the freezer. If you have a larger household, you can always double the batch with very little additional time and effort.
To freeze, wrap the dish tightly in aluminum foil. If the dish is small enough to fit into a freezer bag, use that in addition to the foil. Cool completely before placing in the freezer.
To cook, thaw completely in the fridge. Bake according to the recipe.
For the topping
2 tbsp butter, melted
1 cups, panko
1 cup extra-sharp Cheddar, coarsely grated
For the cheese sauce and macaroni
6 cups broccoli florets, cut into bite sized pieces
3 tbsp unsalted butter
3 tbsp all-purpose flour
2. 3/4 cups milk (you can use any kind, the higher the fat content the richer the sauce will be)
3/4 cup heavy cream
4 cups extra-sharp Cheddar, coarsely grated
2 tsp Dijon mustard
1/4 tsp garlic powder
pinch of ground nutmeg
1 1/2 tsp salt
1/4 teaspoon freshly ground black pepper
3/4 lb pasta of your choice

When most people think of breakfast, they usually envision protein-packed dishes with tons of eggs and various meats and cheeses. But, if you’re like me, you want to start your day with some veggies too. Enter the veggie pancake! These crispy, golden discs are not only full of veggie goodness, but they also bring that protein to (something) thanks to the use of chickpea flour.
These veggie pancakes are easy to make, customizable, and versatile. You can enjoy them with different sauces, toppings, and sides, as a breakfast or packed up for lunch or snack.
Yes. Because this recipe used chickpea flour instead of wheat flour, this recipe is gluten free.
Yep! No animal products are used here. The protein in this recipe comes from the use of chickpea flour, which contains 21 grams of protein per cup of flour.
Chickpea flour, also called besan, if a common cooking ingredient throughout the Indian subcontinent. You can find it in most Indian markets, but it’s also become a common item in general supermarkets as well.
These pancakes are best when they’re freshly cooked and crispy, but they can be stored in an airtight container in the fridge and reheated for later. Your best options are to reheat them in a well-oiled frying pan over medium high heat, in a toaster oven, or air fryer at 350° F for 4-5 minutes. We don’t recommend trying to microwave these, as they will lose all of their crispness.
Absolutely! To freeze the pancakes, let them cool down completely, then stack in between pieces of wax paper. Place them in a large freezer bag and store in the freezer for up to 3 months. You can reheated the pancakes from frozen using the same instructions above, just cook for a few minutes longer to make sure they reheat all the way through.
One of the best things about vegetable pancakes is that you can customize them according to your preferences and availability of ingredients. You can use any vegetables that you like, as longas they are finely chopped or shredded, and mixed well with the batter. Here are some of suggestions for vegetables that you can use in your pancakes;
Zucchini
Carrots
Cabbage
Potatoes
Sweet Potatoes
Kohlrabi
Broccoli
Cauliflower
Mushrooms
Bell Peppers
Sugar Snap Peas
2 cups of mixed shredded vegetables
1 tsp salt
1/2 cup green onion, thinly sliced
1 cup chickpea flour
1 cup water
1 tsp baking powder
2 tbsp corn starch
½ tsp garlic powder
¼ tsp turmeric
Salt and pepper to taste
Neutral oil for frying
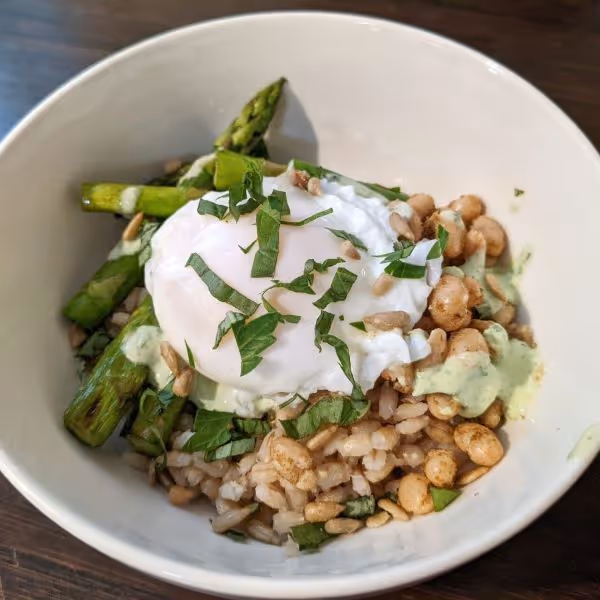
Looking for a healthy way to use up that fresh, spring asparagus? This protein packed grain bowl is perfect for you! It combines asparagus with high fiber barley and protein rich eggs and cannellini beans, topped with a drizzle of flavorful herby yogurt dressing. This grain bowl will fill you up without weighing you down.
Is This Recipe Gluten Free?
Barley is a whole grain that contains gluten, however, you can swap it out for some brown rice for a gluten free alternative.
Can I Make This Recipe Vegan?
Sure! You can easily omit the egg from this meal. And, you can substitute your favorite plant-based plain yogurt or sour cream for the Greek yogurt in the dressing. If you do, you may want to add a tsp or two of nutritional yeast to the dressing to bring more richness to it.
Is This Recipe Good for Meal Prep?
You can definitely prep this in advance for lunches or quick dinners. You'll want to store the egg (if using) and dressing separately from the rest of the bowl components. If you're using soft boiled egg, don't peel it until your ready to eat it. To reheat your egg (peeled soft boiled or poached), gently slip it into a mug hot water for a few minutes, remove it and place it on top of your reheated bowl, then top with the dressing.
For the Bowls:
For the Dressing: